Offset printing is a widely used commercial printing method that produces high-quality prints on a wide range of materials. This popular choice in the printing industry involves the use of metal plates mounted on plate cylinders, which transfer ink onto a rubber blanket cylinder. The ink from the rubber blanket is then transferred to the printing surface, typically sheets of paper, to create the final print. The offset printing process offers many advantages, including vibrant colors, accurate printing, and the ability to print on various textures and uncoated papers. It is ideal for large printing projects, such as marketing materials, business cards, and newspaper inserts. With its precise and efficient printing technique, offset printing remains a top choice for businesses looking for exceptional print quality and cost-effective solutions.
Step 1: Preparing the Artwork
In offset printing, preparing the artwork is a crucial first step in ensuring a successful printing outcome. This process involves considering the wide range of paper stocks, ink types, and printing plate sizes to achieve the desired results.
To begin, it is important to choose the right paper stock for your printing project. Various options are available, such as coated or uncoated papers, textured paper, and specialty stocks. Each has its own unique characteristics that can enhance the appearance and feel of your prints.
Next, selecting the appropriate ink type is vital for achieving vibrant colors and high print quality. Different types of ink, such as oil-based or water-based, can be used depending on the desired finish and durability.
Lastly, the size and setup of the printing plates should be considered. Offset printing uses metal plates that transfer the image onto the printing surface. These plates come in various sizes, and the dimensions need to match the artwork in order to achieve accurate printing.
Overall, preparing the artwork involves creating a high-quality design that takes into account the wide range of paper stocks, ink types, and printing plate sizes. By thoroughly considering these factors, you can ensure that your offset printing project produces professional and visually appealing results.
Step 2: Creating the Plate Cylinder
In offset printing, the plate cylinder plays a crucial role in transferring the image onto the printing surface. This cylinder holds the printing plates, which are responsible for producing high-quality prints. Let’s take a closer look at the process of creating the plate cylinder.
Traditionally, offset printing used plates made of metal, specifically aluminum. Aluminum plates are preferred due to their lightweight nature and durability. These plates are commonly used because they can withstand the pressure involved in the printing process.
The technology used in creating the plate cylinder has evolved with the introduction of Computer-to-Plate (CTP) systems. CTP systems have replaced the traditional plate making processes by directly transferring the digital image onto the aluminum plates, eliminating the need for intermediate steps.
CTP technology offers several advantages over traditional plate making methods. Firstly, it significantly reduces prepress times as there is no longer a need for film-based imaging. This translates to faster project turnaround times and increased efficiency.
Secondly, CTP reduces labor costs since manual processes like film stripping and plate burning are no longer required. This technology streamlines the plate making process, minimizing the potential for errors and increasing overall productivity.
Lastly, CTP systems provide improved print quality. The digital imaging technology ensures accurate reproduction of the artwork onto the plates, resulting in crisp and vibrant prints. The precise control and fine detail achieved with CTP technology contribute to enhanced print quality and customer satisfaction.
By utilizing aluminum plates and CTP systems, the offset printing industry continues to evolve and improve its processes to deliver high-quality prints efficiently.
Step 3: Applying the Ink
Once the image is transferred from the plate cylinder to the rubber blanket, it’s time to apply the ink in offset printing. This crucial step is responsible for producing the vibrant colors and high-quality prints that offset printing is known for.
In offset printing, oil-based inks are typically used. These inks provide a wide range of vibrant colors and excellent image quality. However, it’s important to note that oil-based inks take longer to dry compared to water-based inks used in other printing methods.
After the ink is transferred onto the paper through the blanket cylinder, it needs to dry for a few hours before further processing. This drying process is essential to ensure that the ink sets properly on the paper and avoids smudging or smearing.
The use of oil-based inks and the drying process in offset printing may require some additional time compared to other printing methods. However, the superior print quality and vibrant colors achieved with these inks make it worth the wait. Offset printing is a popular choice for marketing materials, business cards, and other print projects that require high-quality, accurate printing with vibrant colors and sharp image details.
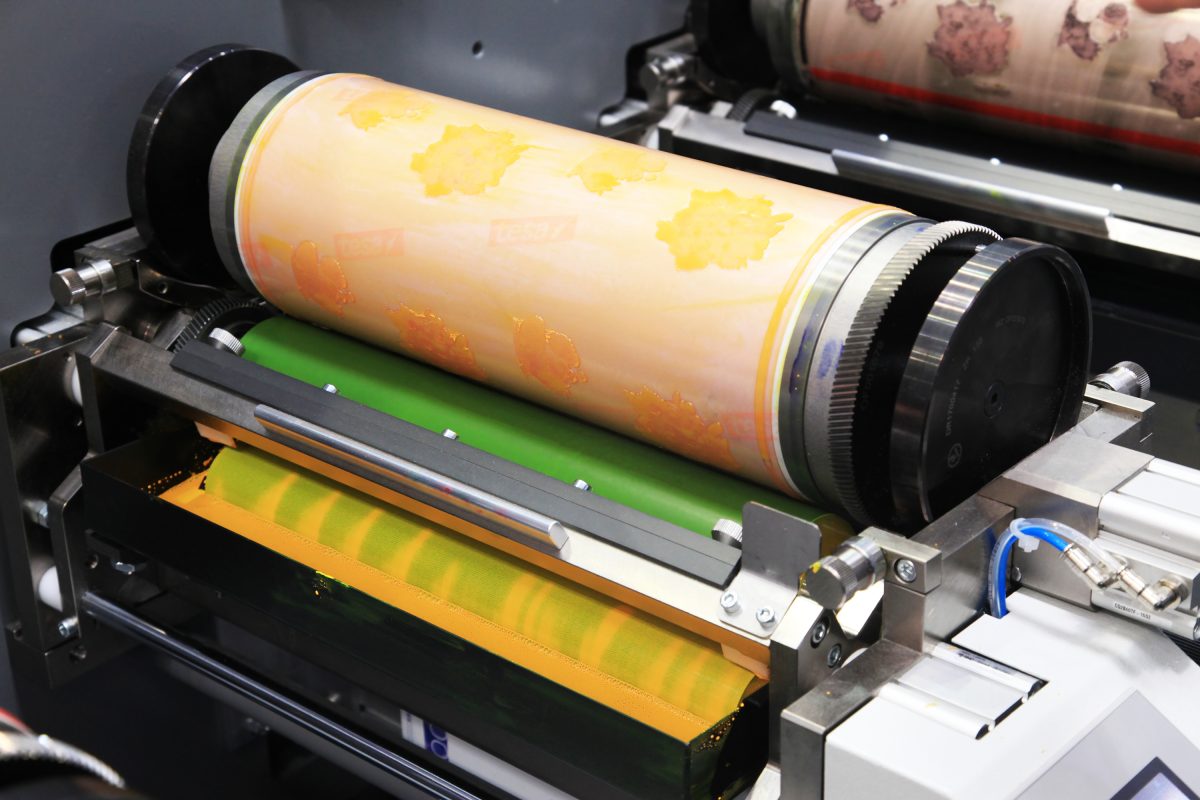
Step 4: Transferring the Image onto a Blanket Cylinder
Once the image is prepared on the printing plates, the next step in the offset printing process is to transfer that image onto a rubber blanket cylinder. This is a crucial step that allows for the ink to be applied onto the paper in a clean and accurate manner.
The printing plates, with the prepared image, are wrapped around the plate cylinder, which is then brought into close contact with the rubber blanket cylinder. As the plate cylinder rotates, the image is transferred onto the rubber blanket cylinder. This transfer is achieved through a combination of pressure and ink.
The rubber blanket cylinder plays a crucial role in the offset printing process. Its flexible and cushioned surface enables it to accept the image from the printing plates and retain all the fine details and colors. It acts as an intermediary between the image and the paper, allowing for a flawless transfer.
What makes offset printing versatile is the fact that the rubber blanket cylinder can accommodate various materials. It is not limited to just paper; it can also print on cardboard, plastic, and even unconventional materials like chocolate. This flexibility makes offset printing a popular choice for a wide range of printing projects.
In the next step, the ink transferred onto the rubber blanket cylinder will be applied onto the paper, creating vibrant and high-quality prints. Stay tuned for the next part of our comprehensive guide on offset printing!
keywords: transferring image, printing plates, rubber blanket cylinder, offset printing process, flexibility, various materials
Step 5: Transferring the Image from the Blanket Cylinder to Printable Surface
In the offset printing process, the image is transferred from the rubber blanket cylinder to the printable surface to create the final print. This step is crucial in ensuring accurate and high-quality prints.
The rubber blanket plays a vital role in this process. Its flexible and cushioned surface allows it to accept the transferred image from the printing plates and retain all the fine details and colors. The ink is transferred from the blanket cylinder to the surface through a combination of pressure and ink.
When the blanket cylinder comes into contact with the paper, a series of interactions take place. The blanket cylinder applies pressure to the paper, ensuring proper ink transfer. The rubber surface of the blanket cylinder also adapts to the texture and characteristics of the paper, allowing for accurate printing on different types of surfaces such as textured or uncoated paper.
This interaction between the paper and the blanket cylinder ensures that the ink is evenly distributed and adheres to the paper, resulting in vibrant colors and sharp image quality. It is this precise transfer of ink from the blanket cylinder to the printable surface that sets offset printing apart as a commercial printing method of choice.
In the next part of our comprehensive guide on offset printing, we will explore the final steps of the process and discuss the advantages of offset printing in more detail. Stay tuned!
Conclusion
Conclusion:
Finishing is a crucial step in the offset printing process that adds the final touches to a printed project, ensuring it is in its complete and desired form. It involves a range of techniques that enhance the functionality and aesthetics of the printed materials.
One common finishing technique is trimming, which involves cutting the printed sheets into their final size. This step ensures uniformity and a professional appearance for the finished product.
Folding is another important technique used in finishing. It allows for convenient packaging, storage, and distribution of the printed materials. Various folding styles, such as bi-fold, tri-fold, and gate-fold, offer versatility and flexibility in presenting information.
Perforation is used to create easy-to-tear sections or lines on the printed materials. This technique is useful for applications like tear-off coupons or response cards, adding functionality and interactivity to the printed piece.
Lastly, binding is the process of securing individual sheets or multiple folded sections together. Binding options include saddle stitching, spiral binding, perfect binding, and wire-o binding. This step ensures durability and keeps the pages of books, brochures, or catalogs intact.
The finishing process typically involves several steps, starting with trimming, followed by folding, perforation if needed, and finally, binding. Each step requires precision and attention to detail to achieve the desired outcome.
In conclusion, finishing is an integral part of the offset printing process, adding functionality, visual appeal, and durability to printed materials. Understanding the importance of finishing techniques like trimming, folding, perforation, and binding can help businesses and individuals create high-quality and professional-looking printed materials for various purposes.